Gigya Social Network CakePHP Plugin
Please Support:
CakePHP Gigya Plugin
Info:
- Version: 0.1
- Requirements: CakePHP 1.3+, PHP 5.1.2+
- Article: CakePHP Gigya Plugin Discussion and Examples
Watch:
Get it:
- Download Now
- git clone git://github.com/webtechnick/CakePHP-Gigya-Plugin gigya
Over the course of the last few weeks, I've been developing a complete social network plugin for CakePHP. The plugin takes advantage of Gigya, a free social network service that allows a developer a single API to interface with multiple social networks, including Facebook, Twitter, Linkedin, Google, OpenID, Yahoo, Myspace, and many more.
Gigya CakePHP Plugin is funded and co-developed by http://flickevents.com. FlickEvents has been nice enough to allow me to open source the plugin for the CakePHP community.
Example:
On top of that, the plugin also acts as a single click registration through a user's social network. Callbacks and overwrites are written within the framework of the plugin. This allows the developer to fine tune any part of the login/logout/connect/user_creation through the use of the built in callbacks.
At the end of the day, by implementing the Gigya Plugin, you are:
- Allowing your users to link their site account to their social networks.
- Allow simple one-click registration.
- Gain detailed information about your user's friends, photos, status
- Post status updates on behalf of your users
- and much more...
To review a full least of features, please review the Gigya site. http://www.gigya.com/
Enough talk, lets get it going!
- Copy the plugin into app/plugins/gigya
- Copy gigya/config/gigya.php.default to app/config/gigya.php and fill out the details.
- Run the Schema into your database.
Start Here: http://wiki.gigya.com/035_Socialize_Setup
You will need to load the required scripts in the head of your layout and use any of the many built in Gigya login/connect/logout/etc.. widgets within your app with the helper.
Example Layout:
You can customize the look and feel of the login/connect widget with tons of options, including custom callbacks both inline (javascript) or through your CakePHP app (url redirects). For a full list of available options you can pass into $gigya->login() review:
http://wiki.gigya.com/030_API_reference/010_Client_API/020_Methods/Socialize.showLoginUI
Some useful examples:
By default, any login will redirect the user to the login action of the plugin. This action will decide how to handle the social network connection.
NOTE: You can change this behavior by passing Routes::url parseable redirectURL param.
Example:
However, this is not recommened, it is recommened to let the plugin handle the logged in user as it does some advanced introspection to determine what to do with the login (ie, link the auth_user_id to the gigya_id, create a new user, or return a valid user_id because the link has already been made).
You can alter the behavior of the flow by defining action callbacks.
user_id to the gigya_uuid is you can use the GigyaApi to make gigya calls based on your local user_id instead of gigya's uuid. This is a much nicer approach to retrieving details or preforming actions on behalf of your users.
Some examples using the built in GigyaUtil:
I encourage you to look over the source, test cases, and of course the gigya developers area. http://wiki.gigya.com/030_API_reference is a good place to start to see what all you can do with this plugin.
As always, comments are much appreciated.
Nick
Gigya CakePHP Plugin is funded and co-developed by http://flickevents.com. FlickEvents has been nice enough to allow me to open source the plugin for the CakePHP community.
The goal
The goal of this plugin is to integrate Gigya's social networking completely with CakePHP Auth component. This means, if everything is setup correctly (and the user allows it), you will be able to get detailed information about your users through all their social networks by using their Auth user_id.Example:
- //show all connected social networks for the logged in user
- 'uid' => $this->Auth->user('id')
- ));
On top of that, the plugin also acts as a single click registration through a user's social network. Callbacks and overwrites are written within the framework of the plugin. This allows the developer to fine tune any part of the login/logout/connect/user_creation through the use of the built in callbacks.
At the end of the day, by implementing the Gigya Plugin, you are:
- Allowing your users to link their site account to their social networks.
- Allow simple one-click registration.
- Gain detailed information about your user's friends, photos, status
- Post status updates on behalf of your users
- and much more...
To review a full least of features, please review the Gigya site. http://www.gigya.com/
Enough talk, lets get it going!
Install
Installation is straight forward, you'll need to:- Copy the plugin into app/plugins/gigya
- Copy gigya/config/gigya.php.default to app/config/gigya.php and fill out the details.
- //app/config/gigya.php
- 'apiKey' => 'GIGYA API KEY',
- 'secret' => 'GIGYA SECRET KEY'
- )
- );
- Run the Schema into your database.
- cake schema create -plugin gigya
Setup
You'll need to signup for a free Gigya account and configure all your social networking apps to let gigya handle the connection/login/posting/etc.. callbacks. Gigya will set up all your apps for free, but it will take ~1 week to have them do it for you. I suggestion just doing it yourself. It's easy, and they've written full tutorials on how to do it, complete with screenshots.Start Here: http://wiki.gigya.com/035_Socialize_Setup
Usage:
The start to any actions the user partakes in starts with the included Gigya helper.- //some controller
You will need to load the required scripts in the head of your layout and use any of the many built in Gigya login/connect/logout/etc.. widgets within your app with the helper.
Example Layout:
- //views/layouts/default.ctp
- <html>
- <head>
- <?= $gigya->loader(); ?>
- </head>
- <body>
- <?php
- //Pseudo code, check if user is logged in or not, usually via Auth.
- if(!$user_id_logged_in){
- echo $gigya->login();
- } else {
- 'plugin' => 'gigya',
- 'controller' => 'socialize',
- 'action' => 'logout'
- ));
- }
- ?>
- </body>
- </html>
You can customize the look and feel of the login/connect widget with tons of options, including custom callbacks both inline (javascript) or through your CakePHP app (url redirects). For a full list of available options you can pass into $gigya->login() review:
http://wiki.gigya.com/030_API_reference/010_Client_API/020_Methods/Socialize.showLoginUI
Some useful examples:
- //Load the widget in a container (default is a popup)
- <div id="login-container"></div>
- 'containerID' => 'login-container'
- )); ?>
- //Only allow facebook, twitter, or linkedin logins/connect
- 'enabledProviders' => 'facebook,twitter,linkedin'
- )); ?>
- //Allow everything EXCEPT a certain provicer
- 'disabledProviders' => 'myspace'
- )); ?>
- //Set height and width and add a style
- //styles: standard (default), blue, fullLogo
- 'height' => '300',
- 'width' => '500',
- 'buttonsStyle' => 'fullLogo'
- )); ?>
By default, any login will redirect the user to the login action of the plugin. This action will decide how to handle the social network connection.
NOTE: You can change this behavior by passing Routes::url parseable redirectURL param.
Example:
- 'controller' => 'gigyas',
- 'action' => 'custom_login'
- )
- ));
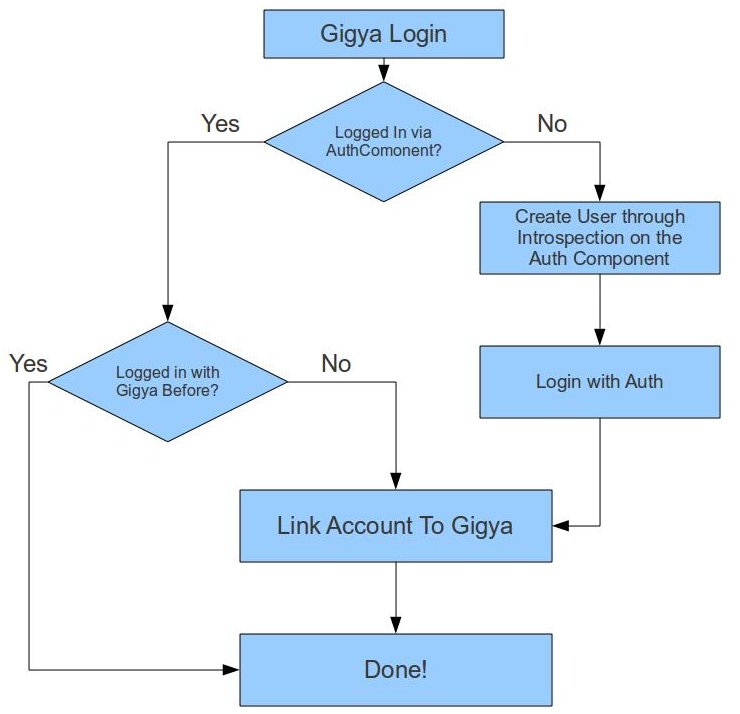
However, this is not recommened, it is recommened to let the plugin handle the logged in user as it does some advanced introspection to determine what to do with the login (ie, link the auth_user_id to the gigya_id, create a new user, or return a valid user_id because the link has already been made).
Login Flow
I've created a simple flowchart to show you how a gigya login click is handled internally by the plugin.
You can alter the behavior of the flow by defining action callbacks.
Available Callbacks
It is important to note that throughout the flow you can bypass or alter the flow with specific callbacks you can define in app_controller.php- /**
- * hands the authenticated user in, if the function returns a
- * valid $user_id the internal handle_user function will be
- * shortcutted proceeding straight to linking the user_id
- * to Gigya
- *
- * @param authenticated social network user
- * @return mixed user_id or boolean false to proceed
- */
- function beforeGigyaLogin($user){
- //return valid user_id or false
- }
- /**
- * Preform some needed logic after a successful login
- *
- * @param authenticated social network user
- * @return void
- */
- function afterGigyaLogin($user){
- //Do something with the user if need be.
- }
- /**
- * Preform some needed logic before a logout
- */
- function beforeGigyaLogout(){
- //Do something...
- }
- /**
- * Allow the developer to decide how to create the user
- * instead of the Gigya plugin guessing what to do
- * by introspection on the Auth Component
- *
- * Defining this callback is preferable to the plugin
- * guessing how your users table is constructed.
- * Although the plugin does a good job of creating a valid
- * user for you, its always nicer to do it yourself to be
- * sure there are no errors.
- *
- * @param authenticated gigya user
- * @return mixed user_id of created user, or false to let plugin decide.
- */
- function gigyaCreateUser($user){
- //create the new user and return the created user_id;
- }
Linking Accounts to Gigya
Upon a successful login, the user_id along with the gigya_uuid will be saved to the gigyas table and linked to gigya. The benefit of linking theuser_id to the gigya_uuid is you can use the GigyaApi to make gigya calls based on your local user_id instead of gigya's uuid. This is a much nicer approach to retrieving details or preforming actions on behalf of your users.
Some examples using the built in GigyaUtil:
- //make sure to import the GigyaUtil somewhere before making calls
- App::import('Lib', 'Gigya.GigyaUtil');
- //get the details of all the social networks the user granted you access
- 'uid' => $user_id
- ));
- //Set the status for your user on ALL their social networks
- 'uid' => $user_id,
- 'status' => 'Posting from the Gigya Plugin!'
- ));
That's it!
There are tons more things you can do natively with the plugin, as its more of a framework to build your custom gigya integration. Anything you can do via the Gigya API you can do with this plugin.I encourage you to look over the source, test cases, and of course the gigya developers area. http://wiki.gigya.com/030_API_reference is a good place to start to see what all you can do with this plugin.
As always, comments are much appreciated.
Nick
